Easy Installation
![]()
|
Wildcat! Interactive
NET Server
Easy Installation! Easy Setup!
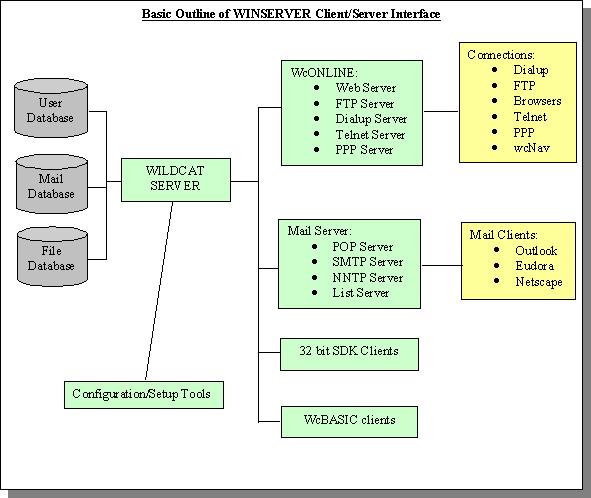
Wildcat! Internet Net Server (WINS) is a powerful client/server
system offering a complete, easy to install dialup and internet hosting
system. For organizations who need just dialup, the internet
is optional. Simply turn it off! However, because of the
client/server framework, all modes of user connectivity are presented
with a consistent message system and file upload/download system.
Wildcat! is ideal for organizations who need a
reliable File Exchange system, such as Medical
Claims, Payroll, Insurance or for supporting your customers with
products!
|
|
|
|
WINS is easy to install and setup! The following illustrates a 5-10
minute basic installation for the following fictitious company, Doggonics Biscuits, Inc., using the following information:
- Allow for 4 modem connections, we assume a RS232 4 port card is installed with 4
modems on the machine,
- Optional, Allow for a web using the domain name, www.doggonics.com
- Optional, Allow for a FTP site using the domain name, ftp.doggonics.com
- Optional, Allow for a Email Service using the domain name, mail.doggonics.com
The domain names specified above are not really necessary at the point of installation.
For testing, you can use the local machine name of where you install WINSERVER.
|
|
First, you install WINSERVER to a directory called \wc6. Answer yes to all
the installation questions.
|
|
Starting the Wildcat! Server:
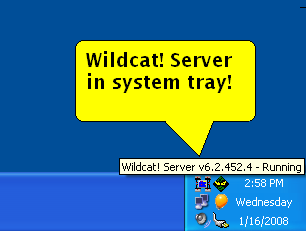
When you are finished with the installation, you start the Wildcat!
Server (wcServer) from the Windows Start Menu. The server
will appear as a little cat face icon on the task tray. You should
hear it beep, signaling "All Systems Go!"
|
|
Wildcat! Configuration:
Second, you run the Wildcat! Configuration utility (wcConfig) from the Windows Start
Menu. wcConfig will present all the available setup options with an Explore like
interface.
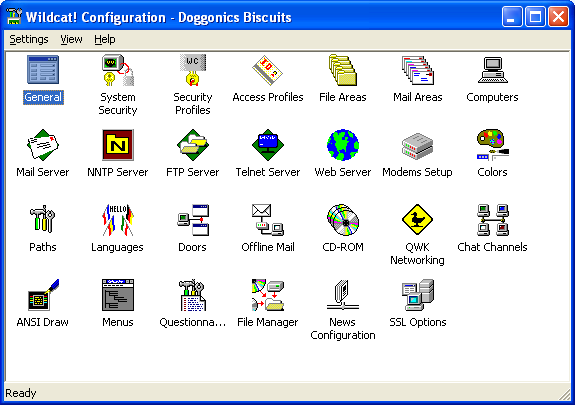
Click here to see a detail view display of the Wildcat
Configuration.
|
|
Setting up the Administrator Name:
Go to the General Setup options and fill in the Administrator name. For example
purposes, we will use an employee named "Brad Breath". This person
should be the top level person who will be the main user account on the system.
He will be able to read private mail, manage files, create user accounts, etc.
In short, he is GOD on this system!. You can use the name "Sysop"
but it is not recommended for security reasons. Wildcat! already understands the
name "Sysop" when writing messages to the sysop. All mail destined to
"sysop" will be automatically directed to the administrator name.
You can also change the BBS System Name to: "Doggonics Biscuits".
Click here to see an image of the General Setup
screen.
|
|
Setting up the Modem Connection Services
Go to the Modem Node Settings option, and begin to add modems to the setup. Add
four nodes for modems. It is ok to use TAPI or use the direct COMx name device.
When you use the COMx device names, you must also know which modem profile to
use for the particular type of modem installed on the COMx device. TAPI makes it
easier by eliminating the need to know or understand MODEM AT commands.
|
|
Setting up the Internet Connection Services
At this point, if you are not interested in setting up internet options, you are
basically done with the connection type services. However you can go to the
Computers Setup section and disable the internet options under the default settings.
Click here to see an image of
the Computers Setup default settings screen.
If you do plan to offer web services, put the domain name www.doggonics.com in the WWW
HOST NAME field in the default Computers setup.
|
|
Setting up the Email Networking Host
At this point, if you not interested in setting up an EMAIL service you can skip this
part. Otherwise go to Networking Setup and click the Host tab. Click Add and type a
host name of "Doggonics". Click OK then fill out the remaining new host
information. Click here to see the host
information screen.
Save the new host information and click the General tab. In the General setup,
fill in the information. Click here
to see the general host information screen.
You are now finished with the basic configuration!
Close the Wildcat! Configuration program.
|
|
Starting the Wildcat! Connection Services
At this point, with the Wildcat! server already running, you can
start the Wildcat! Online
Connection Manager and the Wildcat! Email Service.
If the Wildcat! Server (wcServer) was not running or you wanted to provide an automatic
reboot startup to begin everything, use the WcStart utility to create a startup
configuration. Start the wcStart utility from the Windows Start Menu.
The install program will add a shortcut to the desktop for wcStart.
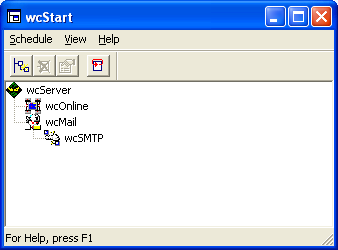
In this case, wcStart was configured to begin wcServer, followed by wcOnline and wcMail
followed by wcSMTP.
You can add wcStart to your Startup Folder with a command line parameter of /RUN so
that the Windows system will automatically start the Wildcat! system for you.
To manually begin the applications, start wcOnline, WcMail, and wcSMTP from the Windows
Start Menu. WcMail and WcSMTP will place icons on the task tray.
WcOnline will display a connection monitoring screen as shown below.
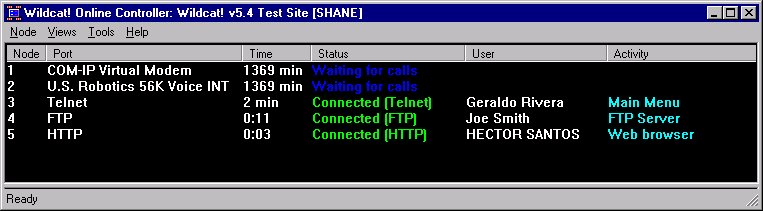
In the above snap shot, we happen to have 2 modems setup with 3 users connected via the
internet. For the fictitious example, you will see 4 modem nodes waiting to answer
calls. All other internet connections will begin on node 5 and up.
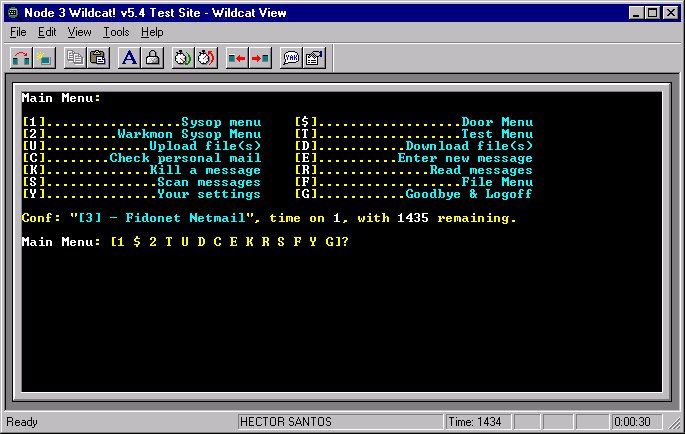
If a sysop is interested in seeing the session activity for one of the nodes above,
you can double click on the node to start wcView. WcView will monitor the session.
It will also allow the sysop to take control of the session as well as disconnect it.
Click here to see a image of WcView in action.
You can also run the wcNODE utility to monitor all the services and
connections. Click here to
see wcNode in action.
|
|
Testing your Wildcat! Setup
To test an FTP connection, type ftp ftp.doggonics.com
To test an Telnet Connection, type telnet bbs.doggonics.com
To test the email system, use your favorite email client like Outlook Express and write
a message to brad.breath@doggonics.com
To test a web connection, use your browser and type http://www.doggonics.com
To test a modem connect, use a telecommunications program and dial into the modem bank.
|
|
Wildcat! also comes with a free GUI Frontend client called Wildcat!
Navigator, WcNAV for short. You can distribute free of charge to
users offering them an outstanding GUI interface into your
Wildcat! Interactive (dot) NET system!
This excellent client offers users dial-in and
internet methods to connect. You can download
wcNavigator from us now! Try
it out against our own system at Santronics Online!
|
|
That's it! It is all pretty basic stuff, yet
Wildcat! Interactive Net Server is powerful and flexible! What we shown here
was very typical, but there is much more to WINSERVER! Get your copy today and
explore the power! If you have any questions, please don't hesitate to contact
Santronics Software.
|
|
|
|
